插槽
本頁面假設您已經閱讀了元件基礎知識。如果您對元件是新手,請首先閱讀。
插槽內容和出口
我們已經瞭解到元件可以接受屬性,這些屬性可以是任何型別的JavaScript值。但是模板內容怎麼辦?在某些情況下,我們可能想要將一個模板片段傳遞給子元件,並讓子元件在其自己的模板內渲染該片段。
例如,我們可能有一個支援以下使用的<FancyButton>元件
template
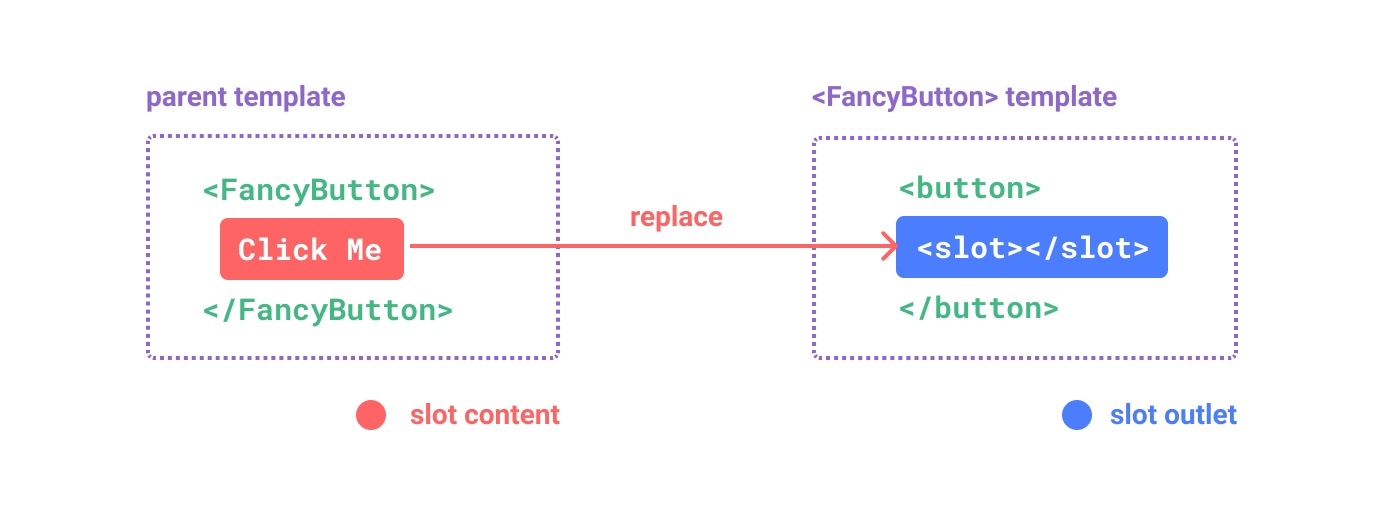
<FancyButton>
  Click me! <!-- slot content -->
</FancyButton><FancyButton>的模板看起來像這樣
template
<button class="fancy-btn">
  <slot></slot> <!-- slot outlet -->
</button><slot>元素是一個插槽出口,它指示父元件提供的插槽內容應渲染的位置。
並且最終的渲染DOM
html
<button class="fancy-btn">Click me!</button>使用插槽,<FancyButton>負責渲染外部的<button>(及其華麗的樣式),而內部內容由父元件提供。
另一種理解插槽的方式是透過將其與JavaScript函式進行比較
js
// parent component passing slot content
FancyButton('Click me!')

// FancyButton renders slot content in its own template
function FancyButton(slotContent) {
  return `<button class="fancy-btn">
      ${slotContent}
    </button>`
}
插槽內容不僅限於文字。它可以是以任何有效模板內容。例如,我們可以傳遞多個元素,甚至其他元件
template
<FancyButton>
  <span style="color:red">Click me!</span>
  <AwesomeIcon name="plus" />
</FancyButton>透過使用插槽,我們的<FancyButton>變得更加靈活和可重用。現在我們可以在不同的位置使用它,並且具有不同的內部內容,但所有這些都具有相同的時尚樣式。
Vue元件的插槽機制靈感來源於原生Web元件<slot>元素,但它具有我們稍後將要看到的附加功能。
渲染範圍
插槽內容可以訪問父元件的資料作用域,因為它是在父元件中定義的。例如
template
<span>{{ message }}</span>
<FancyButton>{{ message }}</FancyButton>這裡兩個{{ message }}插值將渲染相同的內容。
插槽內容無法訪問子元件的資料。Vue模板中的表示式只能訪問其定義的作用域,這與JavaScript的詞法作用域一致。換句話說
父模板中的表示式僅能訪問父作用域;子模板中的表示式僅能訪問子作用域。
備用內容
有時為插槽指定備用(即預設)內容非常有用,以便在沒有提供內容時進行渲染。例如,在<SubmitButton>元件中
template
<button type="submit">
  <slot></slot>
</button>我們可能希望文字“提交”在父元件沒有提供任何插槽內容的情況下渲染在<button>內。要將“提交”作為備用內容,我們可以將其放置在<slot>標籤之間
template
<button type="submit">
  <slot>
    Submit <!-- fallback content -->
  </slot>
</button>現在,當我們在父元件中使用<SubmitButton>,沒有為插槽提供內容時
template
<SubmitButton />這將渲染備用內容,“提交”
html
<button type="submit">Submit</button>但如果我們提供內容
template
<SubmitButton>Save</SubmitButton>那麼提供的內容將被渲染
html
<button type="submit">Save</button>命名插槽
有時在單個元件中具有多個插槽出口很有用。例如,在具有以下模板的<BaseLayout>元件中
template
<div class="container">
  <header>
    <!-- We want header content here -->
  </header>
  <main>
    <!-- We want main content here -->
  </main>
  <footer>
    <!-- We want footer content here -->
  </footer>
</div>在這些情況下,<slot>元素具有一個特殊屬性name,可以用來為不同的插槽分配一個唯一的ID,以便確定內容應該渲染的位置
template
<div class="container">
  <header>
    <slot name="header"></slot>
  </header>
  <main>
    <slot></slot>
  </main>
  <footer>
    <slot name="footer"></slot>
  </footer>
</div>沒有name的<slot>出口隱式具有“預設”名稱。
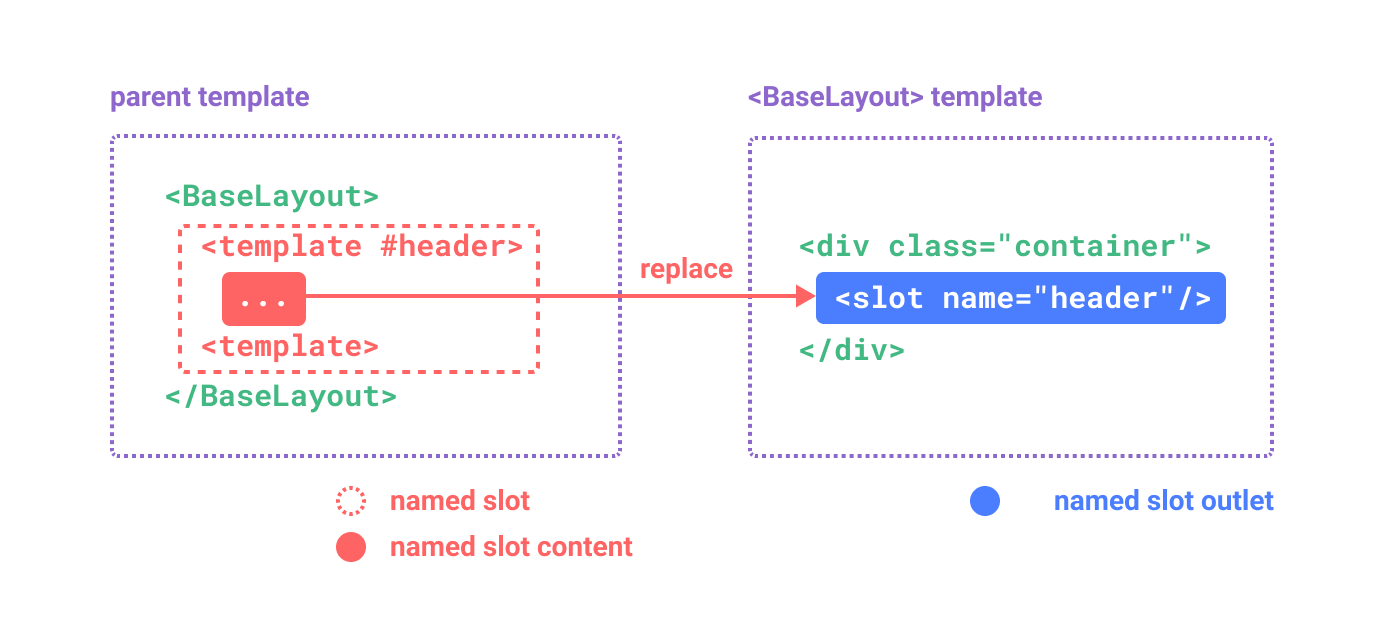
在父元件中使用<BaseLayout>時,我們需要一種方法來傳遞多個插槽內容片段,每個片段針對不同的插槽出口。這就是命名插槽的作用。
要傳遞命名插槽,我們需要使用帶有v-slot指令的<template>元素,然後傳遞插槽名稱作為v-slot的引數
template
<BaseLayout>
  <template v-slot:header>
    <!-- content for the header slot -->
  </template>
</BaseLayout>v-slot有一個專門的簡寫#,所以<template v-slot:header>可以縮短為<template #header>。把它想象成“在子元件的‘header’插槽中渲染此模板片段”。
以下是使用簡寫語法將內容傳遞給所有三個插槽的程式碼
template
<BaseLayout>
  <template #header>
    <h1>Here might be a page title</h1>
  </template>

  <template #default>
    <p>A paragraph for the main content.</p>
    <p>And another one.</p>
  </template>

  <template #footer>
    <p>Here's some contact info</p>
  </template>
</BaseLayout>當一個元件接受預設插槽和命名插槽時,所有頂級非<template>節點都將隱式地視為預設插槽的內容。因此,上面的程式碼也可以寫成
template
<BaseLayout>
  <template #header>
    <h1>Here might be a page title</h1>
  </template>

  <!-- implicit default slot -->
  <p>A paragraph for the main content.</p>
  <p>And another one.</p>

  <template #footer>
    <p>Here's some contact info</p>
  </template>
</BaseLayout>現在,所有在<template>元素內部的內容都將傳遞給相應的插槽。最終渲染的HTML將是
html
<div class="container">
  <header>
    <h1>Here might be a page title</h1>
  </header>
  <main>
    <p>A paragraph for the main content.</p>
    <p>And another one.</p>
  </main>
  <footer>
    <p>Here's some contact info</p>
  </footer>
</div>再次,使用JavaScript函式的類比可能有助於您更好地理解命名插槽
js
// passing multiple slot fragments with different names
BaseLayout({
  header: `...`,
  default: `...`,
  footer: `...`
})

// <BaseLayout> renders them in different places
function BaseLayout(slots) {
  return `<div class="container">
      <header>${slots.header}</header>
      <main>${slots.default}</main>
      <footer>${slots.footer}</footer>
    </div>`
}
條件插槽
有時,您可能需要根據插槽是否存在來渲染某些內容。
您可以使用 $slots 屬性與 v-if 結合使用來實現這一點。
以下示例中,我們定義了一個具有三個條件插槽的 Card 元件:header、footer 和 default。當存在頭部/尾部/預設插槽時,我們想要將它們包裹起來以提供額外的樣式。
template
<template>
  <div class="card">
    <div v-if="$slots.header" class="card-header">
      <slot name="header" />
    </div>

    <div v-if="$slots.default" class="card-content">
      <slot />
    </div>

    <div v-if="$slots.footer" class="card-footer">
      <slot name="footer" />
    </div>
  </div>
</template>動態插槽名稱
動態指令引數 也可以用於 v-slot,允許定義動態插槽名稱。
template
<base-layout>
  <template v-slot:[dynamicSlotName]>
    ...
  </template>

  <!-- with shorthand -->
  <template #[dynamicSlotName]>
    ...
  </template>
</base-layout>
請注意,表示式受到 動態指令引數語法約束 的限制。
作用域插槽
如 渲染作用域 所述,插槽內容無法訪問子元件的狀態。
然而,在某些情況下,如果插槽的內容可以同時使用父作用域和子作用域中的資料,那麼這可能很有用。為了實現這一點,我們需要一種方法,讓子元件在渲染時將資料傳遞給插槽。
實際上,我們可以這樣做——我們可以像傳遞 prop 給元件一樣將屬性傳遞給插槽出口。
template
<!-- <MyComponent> template -->
<div>
  <slot :text="greetingMessage" :count="1"></slot>
</div>
在使用單個預設插槽與使用命名插槽接收 prop 時有所不同。我們將首先透過在子元件標籤上直接使用 v-slot 來展示如何使用單個預設插槽接收 prop。
template
<MyComponent v-slot="slotProps">
  {{ slotProps.text }} {{ slotProps.count }}
</MyComponent>
子元件傳遞給插槽的 prop 可以作為相應 v-slot 指令的值使用,可以在插槽內的表示式中訪問。
您可以將作用域插槽視為傳遞給子元件的函式。然後子元件呼叫它,並將 prop 作為引數傳遞。
js
MyComponent({
  // passing the default slot, but as a function
  default: (slotProps) => {
    return `${slotProps.text} ${slotProps.count}`
  }
})

function MyComponent(slots) {
  const greetingMessage = 'hello'
  return `<div>${
    // call the slot function with props!
    slots.default({ text: greetingMessage, count: 1 })
  }</div>`
}
實際上,這與作用域插槽的編譯方式非常接近,以及您如何在使用手動 渲染函式 時使用作用域插槽。
注意 v-slot="slotProps" 與插槽函式簽名的匹配。就像函式引數一樣,我們可以在 v-slot 中使用解構。
template
<MyComponent v-slot="{ text, count }">
  {{ text }} {{ count }}
</MyComponent>
命名作用域插槽
命名作用域插槽的工作方式類似——插槽 prop 可以作為 v-slot 指令的值訪問:v-slot:name="slotProps"。當使用簡寫時,它看起來像這樣
template
<MyComponent>
  <template #header="headerProps">
    {{ headerProps }}
  </template>

  <template #default="defaultProps">
    {{ defaultProps }}
  </template>

  <template #footer="footerProps">
    {{ footerProps }}
  </template>
</MyComponent>
將 prop 傳遞給命名插槽
template
<slot name="header" message="hello"></slot>請注意,插槽的 name 不會包含在 prop 中,因為它被保留——所以生成的 headerProps 將是 { message: 'hello' }。
如果您正在將命名插槽與預設作用域插槽混合使用,則需要為預設插槽使用顯式的 <template> 標籤。直接在元件上放置 v-slot 指令會導致編譯錯誤。這是為了避免對預設插槽的 prop 作用域的任何歧義。例如
template
<!-- <MyComponent> template -->
<div>
  <slot :message="hello"></slot>
  <slot name="footer" />
</div>
template
<!-- This template won't compile -->
<MyComponent v-slot="{ message }">
  <p>{{ message }}</p>
  <template #footer>
    <!-- message belongs to the default slot, and is not available here -->
    <p>{{ message }}</p>
  </template>
</MyComponent>
使用顯式的 <template> 標籤為預設插槽有助於明確 message prop 不會在其它插槽內部可用。
template
<MyComponent>
  <!-- Use explicit default slot -->
  <template #default="{ message }">
    <p>{{ message }}</p>
  </template>

  <template #footer>
    <p>Here's some contact info</p>
  </template>
</MyComponent>
複雜列表示例
您可能想知道範圍插槽有什麼好的用例。以下是一個示例:想象一個 <FancyList> 元件,它渲染一個專案列表 - 它可以封裝載入遠端資料的邏輯、使用資料顯示列表,甚至高階功能如分頁或無限滾動。然而,我們希望它對每個專案的樣式靈活,將每個專案的樣式留給父元件來處理。所以期望的使用方式可能看起來像這樣
template
<FancyList :api-url="url" :per-page="10">
  <template #item="{ body, username, likes }">
    <div class="item">
      <p>{{ body }}</p>
      <p>by {{ username }} | {{ likes }} likes</p>
    </div>
  </template>
</FancyList>
在 <FancyList> 內部,我們可以多次渲染相同的 <slot>,並使用不同的專案資料(注意我們使用 v-bind 將物件作為插槽屬性傳遞)
template
<ul>
  <li v-for="item in items">
    <slot name="item" v-bind="item"></slot>
  </li>
</ul>無渲染元件
我們上面討論的 <FancyList> 用例封裝了可重用邏輯(資料獲取、分頁等)和視覺輸出,並透過範圍插槽將部分視覺輸出委託給消費者元件。
如果我們進一步推進這個概念,我們可以得到只封裝邏輯而不自行渲染的元件 - 視覺輸出完全透過範圍插槽委託給消費者元件。我們稱這種型別的元件為 無渲染元件。
一個示例無渲染元件可能是封裝跟蹤當前滑鼠位置邏輯的元件
template
<MouseTracker v-slot="{ x, y }">
  Mouse is at: {{ x }}, {{ y }}
</MouseTracker>雖然這是一個有趣的模式,但使用組合式API可以以更高效的方式實現大多數使用無渲染元件可以完成的事情,而不必承擔額外的元件巢狀的開銷。稍後我們將看到如何將相同的滑鼠跟蹤功能實現為一個 可組合的元件。
話雖如此,範圍插槽在需要同時封裝邏輯 和 組合視覺輸出的情況下仍然很有用,例如在 <FancyList> 示例中。